OpenVpn搭建

准备

  • apt install openvpn
    apt install easy-rsa
    
    1
    2
    3
    4
    5
    6
    7
    8
    9
    10
    11

    - ```
    #找到对应文件路径,放入新建文件夹中
    dpkg -L openvpn |grep config
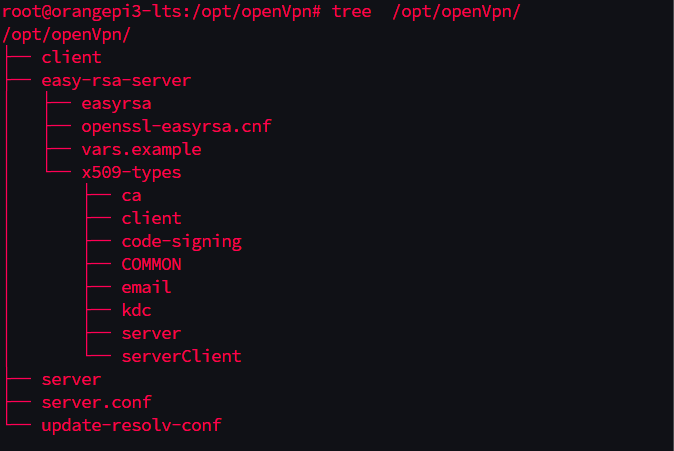
    #创建easy-rsa-server 服务端文件夹
    mkdir easy-rsa-server
    #复制easyrsa
    cd easy-rsa-server
    cp -r /usr/share/easy-rsa/ ./
    #修改 vars.example 文件 --用于设置证书的生成及有效时间(天)
    set_var EASYRSA_CA_EXPIRE 3650
  • image-20250404215656937

创建证书

1.先生成ca根证书

1
2
3
4
5
#初始化
cd easy-rsa-server
./easyrsa init-pki
#创建ca nopass :无密码
./easyrsa build-ca nopass

2.创建server端的证书

1
2
3
4
5
6
7
8
# 生成服务端证书,不需要密码
./easyrsa gen-req server nopass
#签名生成的服务端证书
./easyrsa sign server server
#创建加密密钥
./easyrsa gen-dh
#创建储存加密信息的pem格式文件 2048 是长度
openssl dhparam -out /opt/openVpn/dh2048.pem 2048

3.创建客户端证书

1
2
3
4
5
6
7
8
9
10
11
12
13
14
#创建easy-rsa-client  客户端文件夹
cd ..
mkdir easy-rsa-client
#复制easyrsa
cd easy-rsa-client
cp -r /usr/share/easy-rsa ./
#初始化证书
./easyrsa init-pki
#生成密钥对 xxx 随便起的名字
./easyrsa gen-req xxx nopass
#签发客户端证书
#先从服务端导入客户端生成的req文件 xxx 是别名随便起
cd ../easy-rsa-server
./easyrsa import-req ../easy-rsa-client/pki/reqs/xxx.req xxx

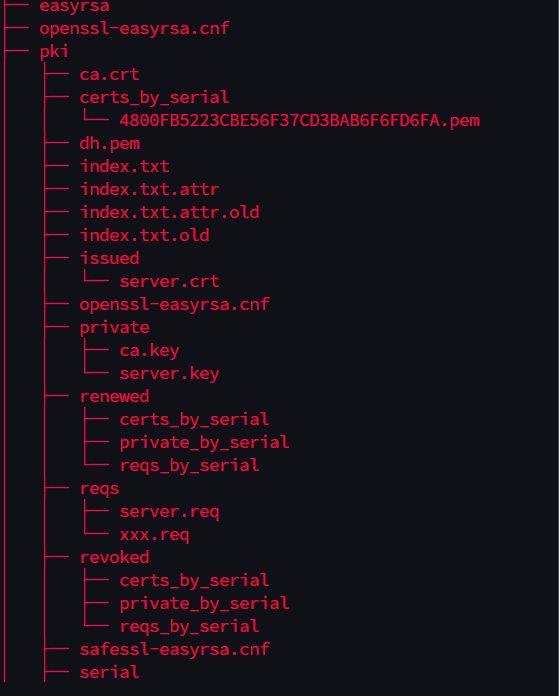
image-20250404224432889

image-20250404230151588

4.签发证书

1
2
# 在服务端签发刚刚生成的req文件
./easyrsa sign-req client xxx

5.创建证书目录

1
2
3
4
5
6
7
8
9
10
11
12
13
14
15
16
17
18
19
#创建个目录
mkdir /opt/openVpn/certs
cd /opt/openVpn/certs
#复制根证书
cp ../easy-rsa-server/pki/ca.crt ./
#复制服务端证书及key
cp ../easy-rsa-server/pki/issued/server.crt ./
cp ../easy-rsa-server/pki/private/server.key ./
# 复制赫曼算法pem
cp ../easy-rsa-server/pki/dh.pem ./
cp /opt/openVpn/dh2048.pem ./
#复制客户端的证书及key
cp ../easy-rsa-client/pki/private/xxx.key ./
cp ../easy-rsa-client/pki/reqs/xxx.req ./
# 在openVpn/clinet 目录下创建一个用户目录
cd /opt/openVpn/clinet
mkdir xxx
#复制客户端所需要的证书文件
find /opt/openVpn/ -name 'xxx.key' -o -name 'xxx.crt' -o -name 'ca.crt'|xargs -i cp {} /opt/openVpn/client/xxx

6.修改服务段配置文件

1
2
3
4
cd /opt/openVpn
#查看哪些需要修改
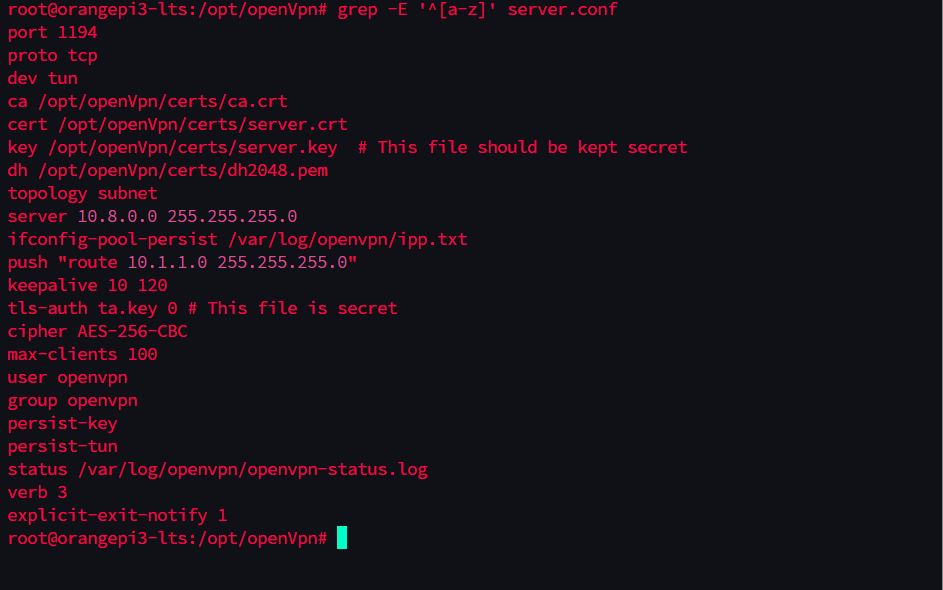
grep -E '^[a-z]' server.conf
#照下面的截图修改

image-20250404234647020

7.创建用户

1
2
3
4
5
# 查看是否有这个用户
id openvpn
# 创建用户
adduser openvpn

8.开启内核转发

1
2
3
4
5
6
7
8
9
10
11
12
13
echo net.ipv4.ip_forward =1 >> /etc/sysctl.conf
#生效参数
sysctl -p
# 添加外网访问 先使用ifconfig 查看哪个网卡与外网访问
# 1. 添加 iptables 规则(临时生效)
sudo iptables -t nat -A POSTROUTING -s 10.1.1.0/24 -j MASQUERADE

# 2. 持久化规则(避免重启后丢失)
sudo apt install iptables-persistent # Debian/Ubuntu
sudo netfilter-persistent save # 保存规则

# 或手动保存(通用方法)
sudo iptables-save > /etc/iptables/rules.v4

9.启动openvpn

1
openvpn --config /opt/openVpn/server.conf --daemon

10.配置客户端

1
2
3
4
5
6
7
8
9
10
11
12
13
14
15
16
17
18
19
20
#复制客户端配置文件
'^[[:alpha:]]' /usr/share/doc/openvpn/examples/sample-config-files/client.conf >./clinet.ovpn
vim clinet.opvn
# 如下配置
client
dev tun
proto tcp
remote 10.1.1.114 1194
resolv-retry infinite
nobind
#persist-key
#persist-tun
ca ca.crt
cert xxx.crt
key xxx.key
remote-cert-tls server
#tls-auth ta.key 1
cipher AES-256-CBC
verb 3

11.下载客户端软件

1
2
3
4
5
6
#windows
https://openvpn.net/downloads/openvpn-connect-v3-windows.msi
#linux
apt install openvpn3
#mac
https://openvpn.net/downloads/openvpn-connect-v3-macos.dmg